
The CB550 frame modification.
- Jonathan Hull

- Nov 12, 2021
- 4 min read
Updated: Nov 13, 2021
If you any of you ever wondered why a high end custom motorcycle can be so expensive, here's the thing: Time. It takes hours, weeks, months, sometimes years. If it's not time on the build itself, it's time spent planning, designing or simply the time that has been dedicated to perfecting and honing the necessary skills to produce motorcycles of that quality. If a motorcycle mechanic can rebuild an engine in an afternoon, it's because they have spent years acquiring the knowledge, honing the skills and gathering the necessary equipment to allow them to do it. The reason I say all this is because I am about to start, what is for me, the most time consuming and labour intensive part of the build process. The frame modification.
As this is a classic motorcycle at 44 years old and as it was sat in a barn for 34 of those years, I thought I should start by getting the frame and swingarm shot blasted. For those of you who might not know, shot blasting is a cleaning process that uses tiny spheres of material to remove paint, rust and other debris from the surface of metalwork. So, this process exposes any areas in the frame that have rusted through. I ran them both down to Daniel Early at K&M Powder in Featherstone, Pontefract. I have been taking Dan all my blasting and powder coating for a couple of years now and he is excellent. He always looks after me and he really knows his stuff. Dan got the two pieces turned around that very afternoon and by 5pm I had them both back in the workshop.

Now, the frame was pretty good considering how long it had been sat. There was some pitting around the bottom section of the main frame in the places you would expect. This was mostly around the centre stand tube that spans across bottom rear. There was also a small breather hole in the bottom of the frame that had rusted out and got somewhat bigger. A tubular section of frame that is closed at both ends has a breather hole put in during the manufacturing process. If you are planning to powder coat a frame once you have worked on it, it is important that these holes are put back in. This is because the process involves temperatures of up to 500 degrees and trapped hot air can warp and distort the metalwork. This is especially important if you are coating steel wheel rims that have a folded, hollow seam. As I said though, the frame wasn't so bad. The swing arm, however, was an entirely different matter, but we'll get to that another time.
The next job on the frame was to clean it up and by that I mean design wise. I needed to cut off all the unnecessary, stock bracketry and mounts that I knew I wouldn't need. If you know me and my design philosophies, you will also know that when it comes to motorcycles, I'm a minimalist.

So, it was time for the fun part. Out came the new angle grinder and sparks began to fly. Obviously, you cant just go hacking at a bike. Apart from having to know for sure that you are not going to need a part before you cut it off, you need to know that you are not altering or diminishing the structural integrity of the motorcycle.
With that in mind, I only needed to work on the subframe. That is the rear part of the motorcycle frame that supports the seat, the rear suspension and also houses the battery and electronics as well as the air box. In some older bikes, you may also get an oil tank in there too. It's no secret that I am a fan of what I call "The Golden Triangle". What I mean by that is the triangular shape under the seat that is created by the subframe. I want it completely clear so you can see straight through the bike with no obstructions. This is a design choice that is common to the café racer but is not easy to achieve. The thing is, you still have to put a lot of the stuff, that would usually be housed in that triangle, back in the bike... somewhere. Anyway, by the time I had finished I had relieved the bike of well over a kilogram of steel. Some of that weight would be put back in elsewhere later, but it was a good start. I removed all the fixings related to the battery box and electrics, the air box and side cover mounts were all gone; I said cheerio to the passenger foot pegs and it's safe to say that it will never rest on a centre stand again.
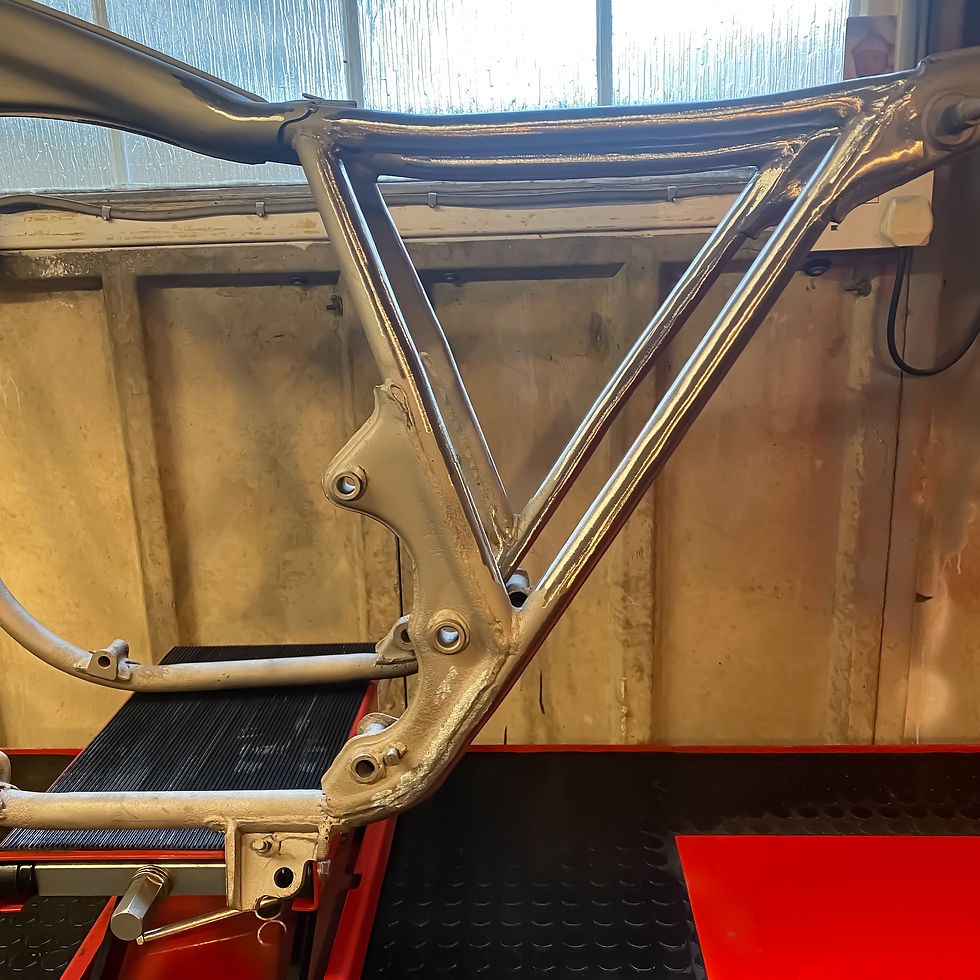
Ladies and Gentleman, I give you...
The Golden Triangle! (insert round of applause...)
At this point, there is still a great deal to do here. I still have to build in a place for the battery (though it's a lot smaller than stock) and all the other electrical components. I also need to figure out the seat hoop and how the seat and cowl is going to look and fit. In order to keep everything super clean and tidy, I am also planning a full length seat pan. So, we'll see how that works out too. Anyway, before this turns into a full tick list of all the jobs I still need to do, I better sign off. Next up, out comes the MIG welder! It's time to start the fabrication process.
Jonathan Hull


Comments